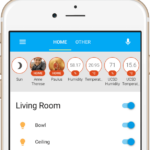
Home Assistant are, for those who do not know, a Open source home automation system. It’s perfect to run on a Raspberry Pi, a local server or in your Kubernetes cluster. It has hundreds of integrations, and is growing in size for every release, making it a super-hub for many other smart devices, like use of Z-Wave network, Zigbee, Philips Hue and others. It also has a huge community where you can seek find lots of help and references to many cool projects. A killer feature is the customizable dashboard. I really like this. You can build multiple dashboards for different screens and purposes. And I have many dashboard, like one dedicated for the a iPad docking mounted on the wall. This one is very nice.

In my home setup I use the zwavejs2mqtt as my Z-Wave controller. This is running on a Raspberry Pi3 with a Aeotec Z-Stick USB Z-Wave Gateway. This is working very well.
The most common setup are running Raspberry Pi with a “Home Assistant OS”, and have both the Home Assistant and zwavejs2mqtt on the same Hardware. The integration is easier for most, but it also have some down side as well, like if you..
- want to reboot the Home-Assistant server whiteout waiting for the Z-Wave network initializing every time
- want the Z-Wave interface in another physical location
- virtualize Home-Assistant and don’t want to deal with USB-pass-through (like in Kubernetes).
- want multiple systems or Home-Assistant instances to communicate with the Z-Wave network.
My local Kubernetes cluster is running in a home-lab server on VMware vSphere, but Home Assistant can in theory run anywhere with a VPN or a network connection to it’s integrations. I prefer to run as much as possible local, making it more nonindependent on cloud solutions and Internet connection (even though I have a very stable Internet connection), and hopefully more secure. In the post Traefik, Cert-Manager and Nextcloud on Kubernetes, you can see how I configured some of the basic in my Kubernetes cluster.
Network overview
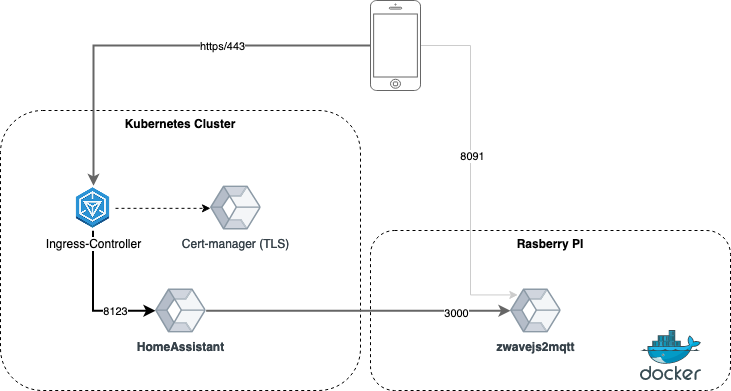
Home Assistant on Kubernetes with zwavejs2mqtt can be visualized like this:

Setup Home Assistant
To install Home Assistant in Kubernetes, I use a great helm chart maintained by the k8s-at-home community. K8s-at-home have many nice charts aiming towards home Kubernetes installation. It’s absolutely recommended to check out.
The installation is quite straight forward, set correct TimeZone, enable ingress with termination of TLS and enable persistence
env:
  TZ: Europe/Oslo
ingress:
  main:
    enabled: true
    annotations:
      cert-manager.io/cluster-issuer: letsencrypt-prod
    hosts:
      - host: homeassistant.example.com
        paths:
          - path: /
persistence:
  config:
    enabled: true
Setup zwavejs2mqtt
The Rasberry Pi 3 are pre-installed with a Debian 10 distro. To run zwavejs2mqtt, we run this as a docker container, but first we need to install some components for docker.
apt-get install -y -qq apt-transport-https ca-certificates curl
curl -sSL https://get.docker.com | sh
I had a issue with the setup of docker so had to switch to the legacy iptables. This can be done using update-alternatives in debian
update-alternatives --set iptables /usr/sbin/iptables-legacyNext, install the docker-machine so the containers can easily start at boot:
apt-get install -y libffi-dev libssl-dev python3 python3-pip
pip3 -v install docker-compose
Docker-compose uses a simple yaml config file, it contains the reference to the docker image, and other variables. Remember to change the environment and USB device name if you copy this part.
version: "3.3"
services:
  zwavejs2mqtt:
    container_name: zwavejs2mqtt
    image: zwavejs/zwavejs2mqtt:latest
    restart: always
    tty: true
    stop_signal: SIGINT
    environment:
      - SESSION_SECRET=SomeSecretString
      - TZ=Europe/Oslo
    networks:
      - zwave
    devices:
      - "/dev/ttyACM0:/dev/ttyACM0"
    volumes:
      - ./store:/usr/src/app/store
    ports:
      - "8091:8091" # port for web interface
      - "3000:3000" # port for zwave-js websocket server
networks:
  zwave:
volumes:
  zwave-config:
You can simple start the container by running the “up” command.
docker-compose up -dVia web UI (http://ip:8091) the zwavejs2mqtt are configured and maintained. In my configuration I only use the Web-Socket feature from Home-Assistant, but it’s also possible to use the MQTT Discovery. Either way, its a good idea to configure the MQTT gateway. I also have a MQTT server running in my Kubernetes cluster. If other tools need to feed on the events, it’s easy to configure later.
You can now start adding z-wave devices to you new controller.
Add integration in Home Assistant
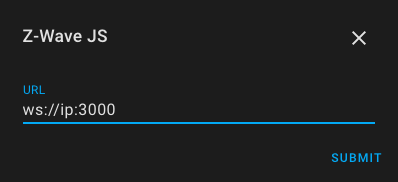
In Home Assistant, under Configuration, you find the Integrations section. Here, click the “Add Integration” butting and search for “Z-Wave JS”. Fill in the IP addressee and port of the zwavejs2mqtt. Next you will se devices automatically discovered. I have found that some devices added to the Z-Wave network are added before I have the chance to rename it in zwavejs2mqtt. Then you must remember to rename it in Home Assistant as well.


